Controller Setup
This guide will help you manually configure your controller for RetroArch.
If your controller was not recognized by RetroArch, it will need to be manually configured. Once configured, we will save it so RetroArch will recognize it on it's next restart.
Step 1 - Input User Binds
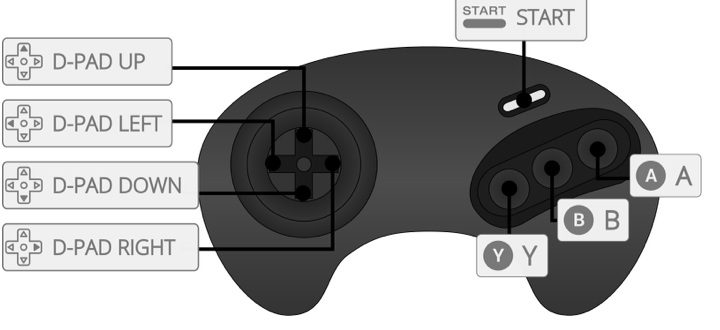
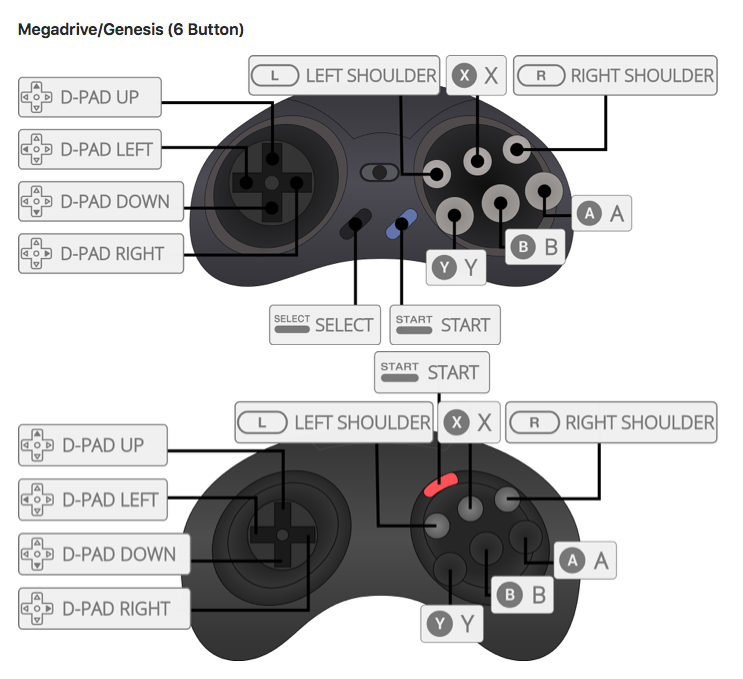
In order for RetroArch to work with multiple emulator cores, it uses a unified controller configuration it calls the "RetroPad". The RetroPad layout is just like an SNES controller. It internally maps certain buttons for other emulator cores. For example, for a Genesis emulator core, RetroPad buttons Y, B and A are mapped to the Genesis A, B, and C buttons respectively.
Below are a few photos of Genesis controllers with their buttons labeled with their RetroPad equivalents:
To set your controls, go to Settings->Input->RetroPad Binds->Port 1 Controls. If you have analog sticks, and would like to use them, set "User 1 Device Type" to "RetroPad w/ Analog". Assign the RetroPad buttons to the buttons on your controller. You only need to set the buttons in RetroArch for the ones you plan on using. Scroll down to the RetroPad equivalent, hit the Enter key, and press the button on your controller.
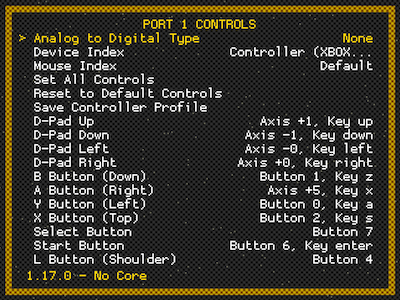
For Genesis players:
- B button = Pass puck/Change player (B button on Genesis)
- Y button = Flip the puck/Stick Hold (A button on Genesis)
- Select button = Ignore (you can let it timeout), or choose a Select button if you have one on your controller
- Start button = Start button on controller
- Up D-Pad = Up on the D-Pad
- Left D-Pad = Left on the D-Pad
- A button = Shoot the puck/Check/Speed Boost (C button on Genesis)
For SNES players, since the RetroPad is the same as an SNES controller, and there should be no confusion. Just skip the button settings your controller doesn't have.
All other buttons can be ignored. You can set the values for an analog stick if your controller has one. If you would like to use the analog stick instead of the D-Pad for movement, after you are done with setting the controls, go up to "User 1 Analog to Digital Type" and select "Left Analog", or "Right Analog", whichever you prefer.
Step 2 - Save the Configuration
To save the configuration, select "Save Controller Profile". Now your controller will be recognized automatically the next time you play!